Q3 Receipt Printer Setup Guide - Windows
The first requirement in setting up your Q3 receipt printer is to ensure your web browser printing settings are correct.
This can be achieved by reading the following knowledge base article.
Complete Printer Setup Guide in onSwim
1. You need to have the printer turned on. There is a power switch at the back of the printer for turning it off and on.
2. Load the paper roll into your printer once you have turned it on.
Installing the Printer Driver
For all Custom Engineering Q3 receipt printers you can download the driver automatically by clicking on the link below:
Note: If the link below does not automatically download the driver to your downloads folder. Please refer to the manual download section below.
Once the driver has downloaded, locate the driver in your downloads folder and run the installation wizard. Ensure your Q3 printer is on and plugged into the computer.
To manually download Q3 Printer Driver
- If the above link does not automatically download the driver for you. Go to the companies website by clicking here!
- Scroll down to the 'Download' heading and click on 'DRIVERS'.
- Click download on the required driver. For Windows click on the second option labelled " Self-installing Driver for Q3 Printer for Windows", for MAC use the option above labelled " Q3 CUPS (Common Unix Printer System) based printer driver".
Changing your driver settings (Windows)
- Open the control panel from your desktop. (accessible through the start menu)
- Once control panel is open, click on 'devices and printers'.
- Find your recently installed Q3 printer in the list, right click on it's name/icon and choose 'printing preferences'.

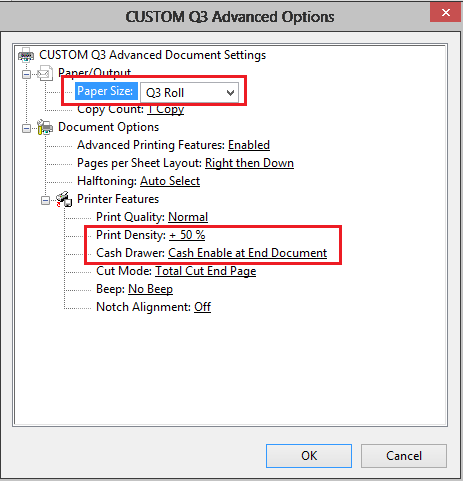
- Click on the "Advanced.." button located near the bottom right corner of the window and adjust the following settings.
- Under 'Paper/Output' --> Change Paper Size to 'Q3 Roll' , then under 'Document Options' then 'Printer Features' --> Change Print Density to '+50%' then change Cash Drawer: to 'Cash Enable at End Document'.
- Click 'Ok'
- Make sure the Orientation is set to 'Portrait', then click 'Apply'.
If you have not already adjusted your Browsers print settings as the "Complete Printer Setup Guide in onSwim" instructed. Below is a quick setup guide.
Chrome Browser Settings
- For Chrome's internal PDF viewer, you will just need to untick the "Fit to page" checkbox when printing.
If you are unsure, make sure that the preview displays the receipt as far up the page as possible. This is because the Q3 will automatically not print any whitespace at the end of the document.
Firefox Browser Settings
Firefox has two main PDF viewers, it's own internal one and Adobe Reader
- Firefox's internal PDF view automatically defaults to the settings you need when printing to the Q3, so there is nothing to worry about here.
- For Adobe Reader, you will need to select the "Actual Size" radio button instead of the "Fit" one when printing
Again, if you are in doubt, look at the print preview and make sure the receipt is up as far as possible, the Q3 will do the rest for you.